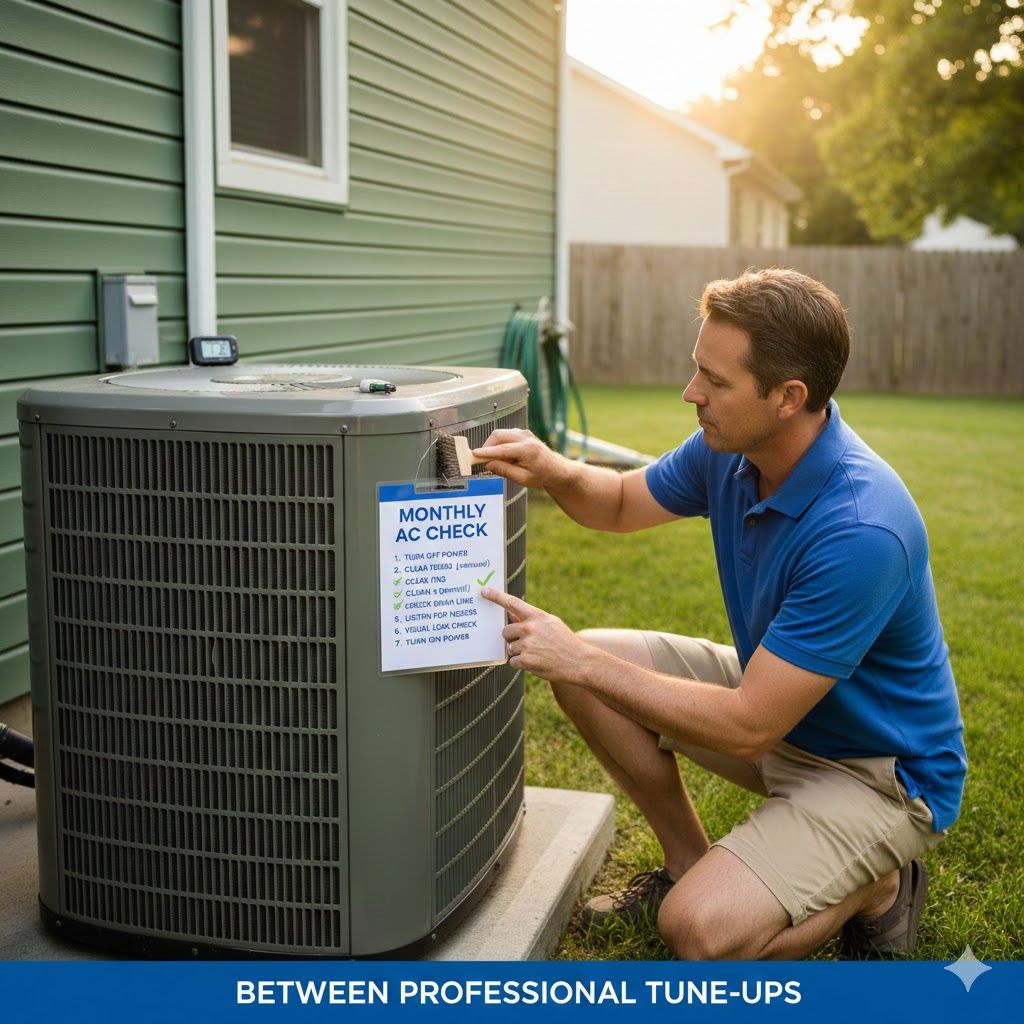
Keeping your air conditioner in great shape does not have to mean crawling through your attic or taking the unit apart. A simple 10‑minute routine once a month can boost efficiency, cut down on surprise breakdowns, and help your system last longer. This quick checklist is designed for regular homeowners, not technicians, and it works best when paired with professional tune‑ups once or twice a year.
Why a 10‑Minute AC Check Matters
Your AC runs many hours a day during warm months, so small issues can add up quickly. Catching problems early is one of the easiest ways to avoid expensive repairs and keep your energy bills under control. A short monthly check also gives you a baseline for what “normal” looks, sounds, and feels like, so you notice changes right away.
Most professional organizations recommend regular filter changes and visual inspections between scheduled maintenance visits. This fast routine focuses only on safe, homeowner‑friendly steps—no opening sealed panels or handling refrigerant.
Step 1: Check and Change Your Air Filter
Your air filter is the heart of easy AC maintenance. A dirty filter chokes airflow, forces the system to work harder, and can shorten the life of major components. For many homes, filters should be inspected monthly and replaced every 1–3 months, with more frequent changes if you have pets, allergies, or a lot of dust.
In your 10‑minute check:
Locate the filter (usually in a return grille or the indoor unit).
Slide it out and hold it up to the light; if you can’t see light clearly through it, it is time to replace.
Make sure the new filter matches the correct size and that the airflow arrow points toward the unit, not the room.
Consistently clean filters help your AC cool more effectively and can reduce energy use by a noticeable margin over the season.
Step 2: Inspect Supply Vents and Return Grilles
Blocked or dirty vents make your AC feel weak even when the system itself is running fine. Over time, dust and pet hair can collect on vent covers, reducing airflow and contributing to poor indoor air quality. Furniture, curtains, and rugs also frequently block vents, especially in smaller rooms.
During your monthly check:
Walk through your home and make sure every supply vent is open and not blocked by furniture or décor.
Wipe or vacuum vent covers and return grilles to remove visible dust build‑up.
Confirm that rooms that usually feel comfortable still feel that way; if one room is suddenly warmer or cooler, that can signal a duct or vent issue.
Keeping vents clear is a quick way to help your system distribute air evenly without any tools or technical knowledge.
Step 3: Look Over the Thermostat
Your thermostat acts as the “brain” of your cooling system. Simple issues like incorrect settings, accidental mode changes, or a weak thermostat battery can mimic big AC problems. A fast monthly glance can save you from unnecessary worry and service calls.
Each month:
Confirm the thermostat is set to “Cool” and “Auto” (for the fan) during cooling season.
Compare the set temperature to the actual room temperature to see if the reading feels accurate.
If you use schedules, make sure nothing has changed and that setback periods still fit your routine.
If the thermostat screen is dim, unresponsive, or shows unusual readings, it may be time to replace batteries or have a professional check the device.
Step 4: Walk Around the Outdoor Unit
Your outdoor condenser needs room to breathe. Leaves, grass clippings, and plant growth can block airflow and make your AC work harder, which raises energy use and adds wear and tear. Most experts recommend keeping at least 2 feet of clearance around the unit so air can flow freely.
In your 10‑minute check:
Visually inspect the area around the outdoor unit and remove loose debris like leaves, branches, or trash.
Trim back shrubs or plants that are encroaching on the sides of the unit.
Look at the top of the unit and make sure there is no object placed on it (like yard tools, storage bins, or decorations).
Do not remove panels or try to straighten fins with sharp tools—that is best left to a technician during a professional tune‑up.
Step 5: Listen for Unusual Sounds
Your ears can catch changes long before a part fails completely. A properly running system usually produces a consistent hum from the outdoor unit and gentle airflow indoors. New or worsening noises often mean something is loose, worn, or obstructed.
Once a month:
Stand near the indoor unit and listen for rattling, grinding, buzzing, or squealing that is new to you.
Step outside and listen to the condenser for loud buzzing, clicking, or metal‑on‑metal scraping.
Make note of anything that sounds different from previous months, even if the system still cools.
Persistent or worsening noises are a sign to schedule a professional inspection rather than continue to run the system and risk further damage.
Step 6: Check for Visible Leaks or Moisture
Moisture around your indoor unit or in the area of the condensate drain line can indicate clogs or drainage issues. Left alone, they can lead to water damage, mold growth, or system shutdowns. Homeowners can safely look for signs of moisture without opening panels.
During your check:
Look under and around the indoor unit for puddles, damp spots, or rust stains that were not there before.
If you can see the condensate drain line (usually a white PVC pipe), verify it is not visibly disconnected or dripping in an unusual place.
Pay attention to any musty smells around the unit that might hint at stagnant water or mold.
If you notice standing water, repeated wet spots, or frequent drain line issues, that is the time to call a professional to clear and inspect the system.
Step 7: Confirm Airflow at a Few Key Vents
Even if vents are open and clean, airflow itself can tell you a lot. Weak or inconsistent airflow can point to clogged filters, duct problems, or issues with the blower. A quick “hand test” does not replace professional instruments, but it can alert you when something changes.
Once a month:
Pick two or three vents in different parts of the home (for example, living room, bedroom, and hallway).
With the system running, place your hand near the vent to feel the strength of the air coming out.
Note any vent that suddenly feels much weaker or warmer than usual compared with the others.
If one area consistently feels off while the rest of the house is fine, mention these details when you schedule your next service appointment.
Step 8: Do a Quick Smell Check
Unusual odors are often one of the first signs that something is not right. A brief smell check when the system starts up can highlight problems like mold, burning dust, or electrical issues. While not every odor is an emergency, none should be ignored if they are strong or recurring.
Each month:
When the AC kicks on, note whether there is a strong musty, burning, or chemical smell.
If you notice a musty odor that persists, it may be related to moisture, dirty coils, or duct contamination.
A sharp burning or electrical smell deserves immediate attention and shutting the system off until a professional can inspect it.
Mild, brief dust smells at the first run of the season can be normal, but anything persistent or harsh should be treated as a warning sign.
How to Use This 10‑Minute Routine
To get real value, treat this as a monthly habit, not a one‑time project. Many homeowners find it easy to pair the AC check with something already on the calendar, such as paying monthly bills or changing smoke‑detector batteries on a set day. The entire routine should take about 10 minutes once you are familiar with where everything is in your home.
Here is a simple way to structure it:
Minute 1–3: Check and replace the air filter if needed.
Minute 4–5: Walk through the house, clear vents, and do the airflow and smell check.
Minute 6–7: Review thermostat settings and confirm the system responds properly.
Minute 8–10: Inspect around the indoor unit for moisture and around the outdoor unit for debris and obstructions.
Keep a small notebook or a note on your phone where you record the date, filter change, and anything unusual you see, hear, or smell. Those notes become very useful when speaking with an HVAC technician, and they help you spot patterns over time.
When to Call a Professional
This monthly 10‑minute AC check is designed to complement, not replace, professional maintenance. Industry guidelines still recommend comprehensive tune‑ups at least once a year, and in hot, humid climates many homeowners benefit from service before each major season. A technician can safely open the system, test electrical components, verify refrigerant levels, and clean internal parts that are not accessible to homeowners.
Schedule professional service if you notice:
Repeated tripping of breakers, electrical smells, or loud new noises.
Hot or cold spots that do not improve after checking filters and vents.
Water leaks, persistent musty odors, or drainage issues.
Rising energy bills even though your usage habits have not changed.
By pairing a fast monthly routine with expert tune‑ups, you give your AC the best chance to run efficiently, keep your home comfortable, and avoid those expensive “no‑cool” emergencies on the hottest days.
