7 Essential Air Filter Steps for Clean Indoor Air
Maintaining a comfortable and healthy home environment starts with understanding how your heating, ventilation, and air conditioning system works. At the core of this system is a small component that plays a massive role in your overall indoor environmental quality: the humble air filter. While it may seem like a simple piece of mesh or pleated fabric, selecting, installing, and maintaining the correct air filter can significantly improve your home’s air quality, protect expensive mechanical equipment, and keep monthly utility bills manageable.
Many homeowners overlook this essential component until their cooling or heating system begins to malfunction, unusual odors circulate through the vents, or dust accumulates rapidly on furniture. By taking a proactive approach to your home HVAC setup, you can avoid costly repair calls and ensure that your family breathes fresh, clean indoor air year-round. This comprehensive guide breaks down everything you need to know about selecting, managing, and optimizing your filtration system for maximum performance.
1. Understand the Core Purpose of Your Air Filter
To appreciate why routine maintenance is necessary, it helps to understand what an air filter actually does inside your system. Many people assume that its primary function is to sanitize the air for human health. While high-efficiency options certainly capture allergens and microscopic pollutants, the original design purpose of an air filter is to protect the internal components of the heating and cooling unit itself.
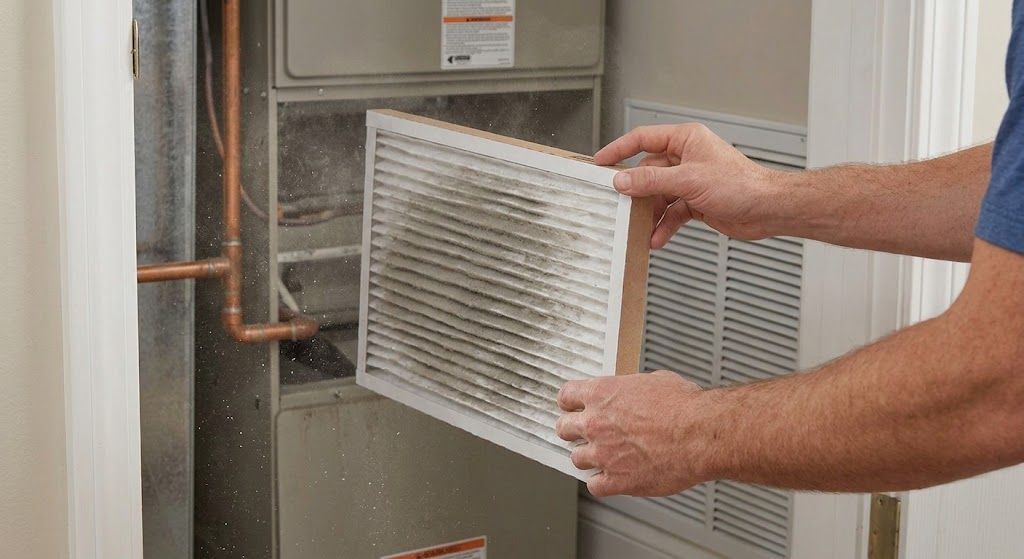
As air recirculates through your home, it carries airborne debris such as dust, pet dander, lint, pollen, mold spores, and textile fibers. Without a protective barrier, these particles accumulate directly on the blower motor, evaporator coils, and electrical contacts. Over time, a thick layer of grime insulates the coils, hindering heat transfer and causing the system to work much harder than designed. In severe cases, restricted airflow can cause evaporator coils to freeze during the summer or heat exchangers to overheat in the winter.
When you install a quality air filter, you create a defensive shield that captures these particles before they enter delicate mechanical compartments. Protecting these components extends the overall lifespan of your HVAC equipment, minimizes sudden breakdowns, and preserves peak operating efficiency.
2. Decode MERV Ratings to Match Your Household Needs
Not every air filter provides the same level of capture efficiency. Filtration performance is standardized across the industry using the Minimum Efficiency Reporting Value, commonly known as the MERV rating scale. Developed by the American Society of Heating, Refrigerating and Air-Conditioning Engineers (ASHRAE), MERV ratings range from 1 to 16 for standard residential and commercial systems, with higher numbers indicating smaller particles captured.
Selecting the correct MERV rating requires balancing your indoor air quality goals with the structural airflow capacity of your specific HVAC unit:
- MERV 1 to 4: These basic fiberglass filters primarily capture large particles like lint, carpet fibers, and dust mites. They offer minimal protection against airborne allergens and are designed almost exclusively to protect equipment rather than improve air quality.
- MERV 5 to 8: Common in standard residential applications, these pleated media options capture medium-sized particles, including mold spores, hairspray residue, and dusting aids. They offer a great baseline balance of protection and steady airflow for average households.
- MERV 9 to 12: These higher-tier options capture fine dust, pet dander, auto emissions, and pollen. They are ideal for households with allergy sufferers, pets, or individuals with mild respiratory sensitivities.
- MERV 13 to 16: Designed for maximum filtration, these advanced units capture micro-droplets, bacteria, tobacco smoke, and fine airborne debris. They provide exceptional indoor air purification but require adequate system blower capacity to prevent air resistance issues.
Choosing a rating that is too high for an older or underpowered HVAC unit can restrict airflow, leading to reduced efficiency and potential equipment strain. Consult your owner's manual or an HVAC technician to determine the maximum recommended rating for your system.
3. Identify the Proper Type and Material
Beyond MERV ratings, physical construction materials vary significantly across different product lines. Understanding these differences allows you to make an informed decision based on your maintenance preferences and budget.
Disposable Fiberglass Options
Fiberglass models feature a thin layer of spun glass fibers held together by a cardboard frame. They are extremely inexpensive and allow maximum airflow, but they provide minimal filtration benefits for airborne particles. They must be replaced frequently and are generally recommended only as temporary solutions or for older units with severely limited airflow capabilities.
Pleated Synthetic Media
Pleated options are crafted from synthetic materials like polyester or cotton blends woven into accordions to expand the total surface area. This increased surface area allows the unit to trap significantly more debris without restricting air circulation as quickly as flat designs. Pleated options represent the modern standard for residential balance, efficiency, and longevity.
Washable and Electrostatic Varieties
Electrostatic models use self-charging synthetic fibers to attract and hold dust particles magnetically. Available in both disposable and reusable washable versions, these options appeal to eco-conscious homeowners. However, washable varieties must be dried completely before reinstallation to prevent mold and mildew growth inside the ductwork.
High-Efficiency Particulate Air (HEPA) Systems
True HEPA media captures up to 99.97% of particles down to 0.3 microns in size. While HEPA technology delivers unmatched air purification, whole-house HEPA systems usually require specialized bypass housing or ductwork modifications because their dense media presents high airflow resistance for standard residential blowers.
4. Establish a Consistent Replacement Schedule
Even the highest-rated product loses effectiveness once its surface becomes saturated with trapped debris. A clogged screen restricts incoming airflow, causing the system to run longer cycles, consume more electricity, and distribute less conditioned air throughout your living spaces. Establishing a reliable maintenance routine prevents these issues.
While generic guidelines often recommend replacing your filtration media every 90 days, your actual timeline depends on several lifestyle and environmental factors:
- Single-Occupant Homes without Pets: Replacement every 6 to 12 months is usually sufficient under low-dust conditions.
- Standard Suburban Homes: A routine cycle of 60 to 90 days maintains steady airflow and clean air.
- Households with One Dog or Cat: High pet dander generation typically shortens the optimal window to every 30 to 60 days.
- Homes with Multiple Pets or Allergy Sufferers: Monthly replacement (every 30 days) prevents dander buildup and helps control peak pollen seasons.
- Peak Heating and Cooling Months: During extreme summer or winter weather, when your unit runs constantly, check the media monthly regardless of pet status.
A simple visual inspection can confirm whether a change is needed sooner. Remove the unit and hold it up toward a bright light source; if light cannot easily pass through the pleated material, the surface is saturated and needs to be swapped out.
5. Master the Proper Installation Technique
Installing a fresh unit is a quick, straightforward task, but minor mistakes during installation can lead to reduced efficiency or air bypass issues.
Follow these simple steps every time you service your unit:
- Power Down the Unit: Turn off your HVAC system at the thermostat before opening the return grille or cabinet door. Working near an active blower fan creates safety hazards and allows unfiltered dust to pull directly into the open system during the swap.
- Locate the Filter Housing: Access panels are typically located in the main return air duct, near the blower unit in your basement or utility closet, or behind large return grilles mounted on hallway walls or ceilings.
- Check the Airflow Direction Arrow: Locate the directional arrow printed on the outer cardboard frame of your new unit. This arrow points toward the direction of airflow—away from the return room and toward the blower fan and furnace/air handler. Installing media upside down or backward reduces efficiency and can cause the frame to buckle under pressure.
- Ensure a Snug Fit: Check that the replacement unit fits tightly within its track or frame. Gaps around the edges allow air to bypass the media entirely, carrying dust straight into your HVAC components.
- Record the Date: Write the installation date on the outer cardboard edge of the frame using a marker so you can quickly track how long it has been in service during future visual inspections.
6. Combine Filtration with Whole-House Maintenance
While a clean air filter handles primary dust control, combining it with broader HVAC maintenance practices maximizes system life and keeps energy consumption low.
Keep supply vents and return grilles clean and unblocked by furniture, drapes, or rugs to allow proper circulation throughout your home. Dust return grilles regularly so loose debris isn't pulled immediately into fresh filtration media. Additionally, schedule annual professional inspections with a certified technician who can clean internal coils, check refrigerant levels, inspect ductwork for leaks, and verify that overall airflow matches your system design specifications.
Addressing small issues promptly prevents sudden failures during severe weather and helps your entire HVAC infrastructure perform reliably season after season.
7. Select High-Performing Replacement Products
Investing in quality replacement options ensures your system maintains proper balance between airflow velocity and dust-holding capacity. Inferior products often feature flimsy frames that bend under normal static pressure, allowing unfiltered air to bypass the media edges. Choosing durable, precision-engineered products protects your equipment investment and maintains healthier air inside your home.
When shopping for dependable replacements, ensure you match the exact depth, width, and length dimensions specified on your current frame or equipment manual. Standard thicknesses range from 1-inch return grille options to 4-inch or 5-inch deep-pleat cabinet media designed for extended service intervals. Matching physical dimensions precisely eliminates gaps and ensures seamless airflow distribution.
To inspect available options and source durable replacements designed for optimal airflow and efficiency, purchase your high-quality air filter directly from trusted industry suppliers.
Frequently Asked Questions
Can a dirty air filter cause my AC unit to freeze up?
Yes. When a filter becomes heavily clogged with dust and debris, it restricts airflow across the evaporator coil. Without sufficient warm air moving over the coil, the refrigerant inside cannot absorb heat properly, causing condensation on the coil to freeze into solid ice.
What is the difference between 1-inch and 4-inch pleated filters?
Depth is the primary difference. A 4-inch deep-pleated model provides significantly more surface area than a standard 1-inch model. This extra surface area allows it to capture more dust over a longer period (often lasting up to 6 to 12 months) without causing a restrictive drop in system airflow pressure.
Is a higher MERV rating always better?
Not necessarily. While higher MERV ratings trap smaller particles, they also create greater resistance to airflow. If your system's blower motor isn't designed to handle higher static pressure, using an overly restrictive model can reduce system cooling capacity, strain the motor, and increase energy costs. Always cross-check your system's manual before upgrading to higher-tier filtration media.
Summary Checklist for Homeowners
To keep your system running smoothly year-round, follow this quick reference checklist:
- [ ] Inspect your filtration media visually at least once per month.
- [ ] Match your selection to your household needs (pets, allergies, dust levels).
- [ ] Verify that the MERV rating falls within your HVAC manufacturer's recommendations.
- [ ] Always double-check the printed airflow direction arrow prior to installation.
- [ ] Ensure the frame sits flush within the housing with no perimeter gaps.
- [ ] Combine regular replacements with annual professional HVAC system checkups.